When summer heat makes turning on the oven unbearable, these no-bake pistachio cookie squares become your dessert salvation. Moreover, these delightful treats combine the rich, buttery flavor of premium pistachios with a creamy, indulgent texture that melts in your mouth. Furthermore, the vibrant green color creates an stunning visual appeal that’s perfect for entertaining.
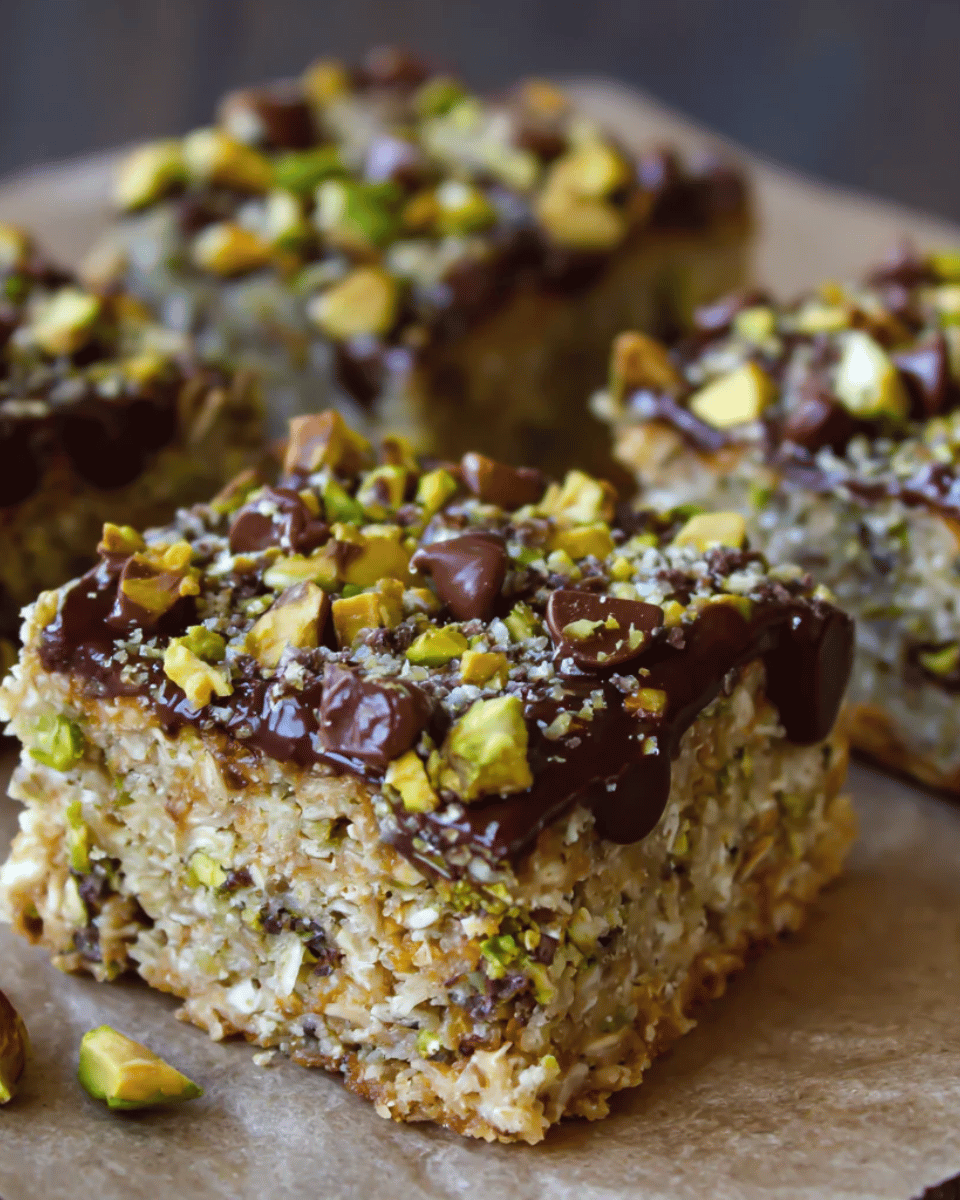
These pistachio cookie squares offer the perfect balance of sweet and salty elements. Additionally, the no-bake convenience means you can whip up an impressive dessert without heating up your kitchen. Consequently, they’re ideal for hot weather entertaining, potluck contributions, or whenever you need a show-stopping dessert in minimal time.

Quick Recipe Overview:
7 Reasons Why No-Bake Pistachio Cookie Squares Will Become Your Go-To Dessert
No Oven Required – Perfect for Hot Weather
These no-bake pistachio cookie squares eliminate the need for oven heat. Therefore, they’re perfect for summer entertaining when you want to keep your kitchen cool. Additionally, this makes them ideal for dorm rooms, RVs, or any kitchen with limited oven access.
Ready in Just 30 Minutes (Plus Chilling Time)
The active preparation time is incredibly short. Furthermore, most of the “work” happens in the refrigerator while the squares set. Consequently, you can prepare these in the morning and have them ready for evening guests.
Beginner-Friendly with Foolproof Results
Even novice bakers can achieve professional-looking results. Moreover, the simple mixing and layering technique requires no special skills. Therefore, these pistachio cookie squares build confidence in the kitchen.
🔗 Related: Trail Mix Energy Squares with Pepitas that guarantee success every time.
Customizable Flavor Combinations
The base recipe adapts beautifully to different flavor profiles. Additionally, you can incorporate chocolate chips, dried fruits, or different nuts. Furthermore, seasonal variations keep the recipe fresh and exciting year-round.
Make-Ahead Convenience
These squares actually improve with time as flavors meld together. Moreover, they store beautifully for up to two weeks. Consequently, they’re perfect for meal prep or advance party planning.
Impressive Presentation for Entertaining
The elegant appearance belies the simple preparation method. Furthermore, the vibrant green color and clean-cut edges create bakery-quality presentation. Therefore, guests will be impressed by your apparent culinary skills.
Budget-Friendly Luxury Dessert
While pistachios seem expensive, a little goes a long way in this recipe. Additionally, the other ingredients are pantry staples. Consequently, you create an upscale dessert without breaking the budget.
What Makes These Pistachio Cookie Squares Special
The distinctive nutty flavor of pistachios sets these squares apart from typical cookie bars. Moreover, the no-bake method creates a unique texture that’s both creamy and substantial. Additionally, the natural oils in pistachios provide richness without heaviness.
These no-bake pistachio cookie squares work beautifully for various occasions. Furthermore, they’re sophisticated enough for dinner parties yet casual enough for family gatherings. Consequently, they’ve become a versatile go-to dessert for many home bakers.
💡 Pro Tip: The key to exceptional pistachio cookie squares lies in using high-quality, fresh pistachios. Therefore, invest in premium nuts for the best flavor payoff.
Must-Have Tools for Perfect No-Bake Pistachio Cookie Squares
Primary Equipment
9×13 inch baking pan – This size creates the perfect thickness for your squares. Moreover, the rectangular shape allows for even cutting. Additionally, a metal pan conducts cold better than glass, helping the squares set faster.
Food processor – Essential for achieving the ideal pistachio texture. Furthermore, it ensures even grinding without over-processing. Consequently, you’ll get consistent results every time.
Electric mixer – While hand mixers work, stand mixers provide more consistent results. Moreover, they free your hands for adding ingredients gradually. Additionally, the powerful motor handles thick mixtures easily.
Measuring cups and spoons – Accuracy is crucial for proper texture and flavor balance. Furthermore, dry and liquid measuring tools serve different purposes. Therefore, having both types ensures recipe success.
Supporting Tools
Rubber spatula – Perfect for scraping bowls clean and folding ingredients gently. Moreover, the flexible edge reaches every corner. Additionally, it won’t scratch non-stick surfaces.
Sharp knife – Clean cuts require a sharp blade. Furthermore, wiping the knife between cuts prevents dragging. Consequently, you’ll achieve professional-looking squares.
Parchment paper – Creates easy removal and prevents sticking. Moreover, it eliminates the need for excessive greasing. Additionally, it makes cleanup effortless.
🔗 Equipment Guide: Oklahoma Nut Candy for your kitchen arsenal.
Optional but Helpful
Kitchen scale – Provides precision that volume measurements can’t match. Furthermore, it’s especially helpful for consistent pistachio quantities. Additionally, professional bakers rely on weight measurements.
Offset spatula – Creates smooth, even surfaces on your squares. Moreover, it helps achieve bakery-quality presentation. Consequently, your desserts look professionally made.
Pre-Recipe Preparation for No-Bake Pistachio Cookie Squares Success
Before You Begin
Room temperature ingredients blend more easily and create smoother textures. Moreover, cold ingredients can cause the mixture to seize or become lumpy. Therefore, plan to remove dairy products from the refrigerator 30 minutes before starting.
Workspace organization streamlines the process significantly. Furthermore, having all ingredients measured and tools ready prevents mistakes. Additionally, this mise en place approach is used by professional chefs worldwide.
Pro Preparation Tips
Toast your pistachios lightly before processing for enhanced flavor depth. Moreover, this step removes any residual moisture that could affect texture. However, allow them to cool completely before grinding.
Line your pan with parchment paper, leaving overhang for easy removal. Furthermore, lightly spray the parchment for extra insurance. Consequently, your squares will lift out perfectly intact.
⚡ Time-Saving Tip: Prepare your pan and measure ingredients while your dairy products come to room temperature. Therefore, you’ll maximize efficiency and minimize total prep time.
Everything You Need for No-Bake Pistachio Cookie Squares
For the Cookie Base
- 2 cups graham cracker crumbs (about 16 crackers, finely crushed)
- 1/2 cup unsalted butter, melted and slightly cooled
- 1/4 cup granulated sugar
- 1/4 teaspoon salt
For the Pistachio Filling
- 1 1/2 cups shelled pistachios, unsalted and preferably raw
- 8 oz cream cheese, room temperature
- 1 cup powdered sugar, sifted
- 1 cup heavy whipping cream, cold
- 1 teaspoon vanilla extract
- 1/4 teaspoon almond extract (optional, but recommended)
- 1/4 teaspoon salt
For the Topping Layer
- 1/2 cup chopped pistachios, for garnish
- 2 tablespoons powdered sugar, for dusting
- Pinch of sea salt (optional, for finishing)
📝 Ingredient Notes:
- Use high-quality pistachios for best flavor – avoid pre-salted varieties
- Full-fat cream cheese creates the richest texture
- Cold heavy cream whips better than room temperature
How to Make Perfect No-Bake Pistachio Cookie Squares
Step 1 – Prepare Your Pan and Workspace
Line your 9×13 inch baking pan with parchment paper, ensuring 2-inch overhangs on opposite sides. Moreover, these “handles” will help you lift the finished squares out easily. Additionally, lightly spray the parchment with cooking spray for extra insurance against sticking.
Clear your workspace and arrange all ingredients within easy reach. Furthermore, have your food processor and mixing bowls ready. Consequently, you’ll work efficiently without scrambling for tools mid-recipe.
Set up your refrigerator space by clearing a flat shelf that can accommodate your pan. Moreover, ensure the area is level to prevent uneven setting. Additionally, avoid placing the pan near strong-smelling foods that could affect flavor.
💡 Step 1 Tip: If your parchment paper keeps curling up, lightly dampen the pan corners before pressing the paper down. Therefore, it will stay in place during filling.
Step 2 – Create the Cookie Base
Combine graham cracker crumbs, melted butter, granulated sugar, and salt in a medium bowl. Moreover, mix thoroughly until the mixture resembles wet sand and holds together when squeezed. Additionally, the butter should be evenly distributed throughout.
Press the mixture firmly into the bottom of your prepared pan using clean hands or the bottom of a measuring cup. Furthermore, pay special attention to corners and edges for even thickness. Consequently, you’ll create a stable foundation for your layers.
The base should be compact enough to hold together but not so compressed that it becomes hard. Moreover, aim for even thickness across the entire surface. Additionally, smooth any rough spots with your hands or a spatula.
Refrigerate the base for 15 minutes while you prepare the filling. Furthermore, this brief chilling helps it set and prevents mixing with the next layer. Therefore, you’ll achieve distinct, clean layers.
🔗 Perfect Crusts: Old Fashioned Peanut Butter Pie with our comprehensive guide.
Step 3 – Process the Pistachios
Add 1 1/2 cups of pistachios to your food processor and pulse in short bursts. Moreover, this prevents over-processing that could turn nuts into butter. Additionally, scrape down the sides every few pulses for even grinding.
Process until you achieve a fine, meal-like consistency with some small pieces remaining. Furthermore, the mixture should hold together when pinched but not be completely smooth. Consequently, you’ll maintain textural interest in the final product.
Avoid continuous processing, which generates heat and releases oils. Moreover, the goal is a coarse meal, not nut butter. Additionally, some slightly larger pieces add pleasant texture contrast.
Reserve 2 tablespoons of the processed pistachios for garnish if desired. Furthermore, this ensures color and texture consistency in your final presentation. Therefore, your squares will have professional-looking finishing touches.
⚠️ Processing Warning: Stop immediately if the pistachios start clumping together or releasing oils. Moreover, over-processed nuts will create a paste that won’t incorporate well into the filling.
Step 4 – Prepare the Pistachio Filling
Beat the room-temperature cream cheese in a large bowl until smooth and fluffy, about
2-3 minutes. Moreover, scrape down the bowl sides frequently to ensure even mixing. Additionally, any lumps at this stage will remain in the final product, so thorough beating is essential.
Gradually add the sifted powdered sugar, beating continuously until fully incorporated. Furthermore, the mixture should be smooth and light in color. Consequently, you’ll create the perfect base for your pistachio flavor.
Add vanilla extract, almond extract (if using), and salt to the cream cheese mixture. Moreover, beat until just combined to avoid overworking. Additionally, these extracts enhance the pistachio flavor without overwhelming it.
In a separate bowl, whip the cold heavy cream to soft peaks using an electric mixer. Furthermore, be careful not to overwhip, as this can lead to a grainy texture. Additionally, soft peaks will fold more easily into the cream cheese base.
Gently fold the processed pistachios into the cream cheese mixture using a rubber spatula. Moreover, use a folding motion rather than stirring to maintain airiness. Additionally, ensure even distribution throughout the mixture.
Finally, fold the whipped cream into the pistachio-cream cheese mixture in three additions. Furthermore, this gradual incorporation maintains the light, fluffy texture. Consequently, your filling will be perfectly smooth and airy.
🥄 Folding Technique: Cut down through the center of the mixture, sweep across the bottom, and fold up and over. Moreover, rotate the bowl quarter-turns as you work for even incorporation.
Step 5 – Assembly Process
Remove the chilled base from the refrigerator and spread the pistachio filling evenly over the surface. Moreover, use an offset spatula for the smoothest application. Additionally, work from the center outward to prevent air bubbles.
Gently tap the pan on the counter to settle the filling and release any trapped air. Furthermore, this ensures a smooth, even surface. Consequently, your finished squares will have professional-quality appearance.
Smooth the top surface with your spatula, creating clean edges where the filling meets the pan sides. Moreover, pay attention to corners where filling tends to be thinner. Additionally, aim for uniform thickness across the entire surface.
Sprinkle the reserved chopped pistachios evenly over the surface for garnish. Furthermore, gently press them into the filling so they adhere properly. Therefore, they won’t fall off when you cut the squares.
Step 6 – Chilling and Setting
Cover the pan tightly with plastic wrap, ensuring the wrap doesn’t touch the surface. Moreover, this prevents condensation from forming on your beautiful finish. Additionally, proper covering prevents absorption of refrigerator odors.
Refrigerate for at least 4 hours, though overnight is preferred for best results. Furthermore, the longer chilling time allows flavors to meld beautifully. Consequently, patience here pays off in superior taste and texture.
Test for proper setting by gently pressing the center with your finger. Moreover, it should feel firm and spring back slightly. Additionally, the edges should pull away cleanly from the pan sides.
Before cutting, allow the pan to sit at room temperature for 5-10 minutes. Furthermore, this slight warming makes cutting cleaner and easier. Therefore, you’ll achieve those perfect, bakery-quality edges.
❄️ Chilling Tip: Place the pan on a flat refrigerator shelf away from the door. Moreover, temperature fluctuations from frequent opening can affect setting quality.
Recipe Variations and Tips
Flavor Variations
Chocolate Pistachio Combination: Add 1/2 cup mini chocolate chips to the filling or drizzle melted chocolate over the finished squares. Moreover, dark chocolate complements pistachios beautifully. Additionally, this creates an elegant flavor profile perfect for special occasions.
Coconut Pistachio Blend: Replace 1/4 cup of pistachios with unsweetened shredded coconut. Furthermore, add 1/2 teaspoon coconut extract to enhance the tropical flavor. Consequently, you’ll create an exotic twist on the classic recipe.
Lemon Pistachio Twist: Add 2 tablespoons fresh lemon zest and 1 tablespoon lemon juice to the filling. Moreover, the citrus brightness balances the rich nuts perfectly. Additionally, this variation is particularly refreshing in summer.
Dietary Modifications
Vegan Adaptation: Substitute vegan cream cheese and coconut whipping cream for dairy ingredients. Moreover, use vegan butter in the crust. Additionally, ensure your graham crackers are vegan-friendly.
Gluten-Free Alternative: Replace graham crackers with gluten-free cookies or almond flour mixture. Furthermore, verify all ingredients are certified gluten-free. Consequently, those with celiac disease can enjoy these treats safely.
Keto-Friendly Version: Use almond flour crust and sugar-free sweeteners throughout. Moreover, the high fat content from nuts and cream cheese fits keto macros well. Additionally, this modification maintains the rich, satisfying texture.
How to Serve No-Bake Pistachio Cookie Squares Like a Pro
Presentation Techniques
Use a sharp, clean knife to cut perfect squares, wiping the blade between cuts. Moreover, this prevents dragging filling and ensures clean edges. Additionally, mark your cutting lines lightly before making full cuts for even portions.
Arrange squares on a white or neutral-colored platter to showcase the beautiful green color. Furthermore, leave space between pieces for elegant presentation. Consequently, each square becomes an individual work of art.
Dust lightly with powdered sugar just before serving for an elegant finish. Moreover, use a fine-mesh sieve for even distribution. Additionally, this adds visual appeal and a touch of sweetness.
Garnish the platter with fresh mint leaves or additional chopped pistachios. Furthermore, these natural elements enhance the color palette. Therefore, your presentation will have restaurant-quality visual appeal.
🎨 Presentation Tip: Serve on chilled plates to maintain the squares’ shape longer. Moreover, this professional touch shows attention to detail that guests will notice and appreciate.
Portion Control and Sizing
Standard 2×3 inch squares provide satisfying portions without being overwhelming. Moreover, this size allows for 16 generous servings from one pan. Additionally, the rich nature of these squares means smaller portions are quite satisfying.
For parties, consider cutting smaller 1.5×2 inch pieces to allow guests to sample other desserts. Furthermore, this approach works well for dessert buffets. Consequently, you can serve more people from a single batch.
Individual serving suggestions include pairing with fresh berries or a small dollop of whipped cream. Moreover, these additions provide color contrast and flavor balance. Additionally, they create a more substantial dessert presentation.
🔗 Portion Planning: Coconut Date Energy Squares for any size gathering or event.
Occasion-Specific Serving Ideas
Holiday Presentation: Cut into festive shapes using cookie cutters for special occasions. Moreover, arrange on themed serving ware. Additionally, coordinate garnishes with holiday colors for seasonal appeal.
Casual Gatherings: Serve directly from the pan with a sharp knife for guests to cut their own portions. Furthermore, provide small plates and napkins nearby. Consequently, this creates a relaxed, family-style atmosphere.
Formal Dinner Parties: Pre-cut elegant squares and plate individually with complementary sauces or garnishes. Moreover, consider temperature contrast with a small scoop of sorbet. Therefore, you’ll create a sophisticated dessert course.
Troubleshooting Your No-Bake Pistachio Cookie Squares
Texture-Related Issues
Over-processing pistachios creates a paste-like consistency that doesn’t incorporate well. Moreover, this can make the filling heavy and dense. Additionally, the natural oils released can affect the setting process negatively.
Insufficient chilling time results in soft, difficult-to-cut squares. Furthermore, rushing this step compromises both texture and presentation. Consequently, always allow the full recommended chilling time.
Incorrect ingredient ratios can cause setting problems or flavor imbalances. Moreover, measuring accurately is crucial for consistent results. Additionally, ingredient substitutions should be made carefully with proper conversions.
Temperature-related problems occur when ingredients aren’t at proper temperatures before mixing. Furthermore, cold cream cheese won’t blend smoothly. Therefore, plan ahead for proper ingredient preparation.
🔧 Quick Fix: If your squares are too soft after chilling, place them in the freezer for 30 minutes before cutting. Moreover, this temporary firming makes clean cuts possible.
Assembly Mistakes
Uneven layer distribution creates inconsistent texture and appearance. Moreover, take time to spread each layer carefully and evenly. Additionally, use proper tools like offset spatulas for best results.
Poor pan preparation leads to sticking and difficult removal. Furthermore, proper parchment paper lining is essential. Consequently, don’t skip this crucial step even if your pan is non-stick.
Inadequate pressing technique for the base layer results in crumbly, unstable foundations. Moreover, the base should be firmly compacted but not rock-hard. Additionally, even thickness prevents weak spots.
Flavor Balance Problems
Oversweetening issues can mask the delicate pistachio flavor. Moreover, balance is key in this recipe. Additionally, remember that pistachios have natural sweetness that should shine through.
Salt balance importance cannot be overstated in dessert recipes. Furthermore, a pinch of salt enhances sweetness and brings out nutty flavors. Consequently, don’t omit salt even in sweet applications.
Pistachio flavor intensity depends on nut quality and freshness. Moreover, stale nuts will produce flat-tasting results. Therefore, invest in high-quality, fresh pistachios for best flavor impact.
Advanced Tips for No-Bake Pistachio Cookie Squares Mastery
Professional Techniques
Temperature control mastery involves understanding how temperature affects each component. Moreover, room temperature ingredients blend more easily. Additionally, proper chilling temperature ensures optimal setting.
Texture optimization methods include proper mixing techniques and ingredient preparation. Furthermore, understanding when to fold versus beat creates superior results. Consequently, your squares will have professional-quality texture.
Flavor enhancement secrets involve layering complementary flavors and using quality extracts. Moreover, toasting nuts before processing intensifies flavor. Additionally, proper salt balance brings out natural sweetness.
Quality Upgrades
Premium ingredient selection makes a noticeable difference in final results. Moreover, high-quality cream cheese and fresh nuts create superior flavor. Additionally, pure vanilla extract outperforms imitation versions significantly.
Artisanal pistachio sources often provide better flavor and color than mass-market options. Furthermore, specialty food stores typically carry superior nuts. Consequently, the investment in quality ingredients pays off in taste.
Perfect Pairings for No-Bake Pistachio Cookie Squares
Fresh Berry Compote
The natural acidity in fresh berries provides perfect balance to the rich, creamy pistachio squares. Moreover, the bright colors create stunning visual contrast on the plate. Additionally, seasonal berries add freshness that cuts through the dessert’s richness beautifully.
Prepare a simple compote by gently cooking mixed berries with a touch of sugar and lemon juice. Furthermore, the slight tartness enhances the pistachio flavor rather than competing with it. Consequently, this pairing creates a restaurant-quality dessert experience.
Strawberries, raspberries, and blackberries work particularly well due to their natural acidity. Moreover, their jewel tones complement the green pistachios visually. Additionally, the soft texture contrasts nicely with the firm squares.
Serve the compote slightly warm or at room temperature alongside chilled squares. Furthermore, the temperature contrast adds another layer of sensory interest. Therefore, guests experience multiple textures and temperatures in each bite.
Vanilla Bean Ice Cream
Classic vanilla ice cream provides creamy coolness that complements the dense texture of the squares. Moreover, real vanilla bean specks add visual interest and intense flavor. Additionally, the cold temperature creates pleasant contrast with room-temperature squares.
Choose high-quality ice cream with real vanilla beans for best results. Furthermore, the premium ingredients match the sophistication of your homemade squares. Consequently, the pairing feels cohesive and intentional.
Serve small scoops alongside square portions rather than on top to maintain presentation integrity. Moreover, this allows guests to enjoy each component separately or together. Additionally, it prevents the ice cream from overwhelming the delicate pistachio flavor.
Consider slightly softening the ice cream before serving for easier scooping and better flavor release. Furthermore, properly tempered ice cream has better mouthfeel. Therefore, plan to remove it from the freezer 5-10 minutes before serving.
Espresso or Strong Coffee
The bitter notes in espresso create perfect flavor balance with sweet, rich pistachio squares. Moreover, caffeine provides a pleasant contrast to the dessert’s indulgent nature. Additionally, this pairing follows traditional Italian dessert service customs.
Serve espresso in small cups alongside dessert portions for authentic presentation. Furthermore, the ritual of coffee service adds elegance to the dessert course. Consequently, guests feel pampere
Soft squares typically result from insufficient chilling time or incorrect ingredient ratios. Moreover, ensure you’ve used the full amount of cream cheese and chilled for at least 4 hours. Additionally, over-whipped cream can break down and create soft texture.
Temperature fluctuations during chilling can also cause softness issues. Furthermore, frequent refrigerator door opening affects setting. Therefore, place squares on a stable shelf and avoid disturbing during chilling.
Can I add chocolate to this recipe?
Absolutely! Chocolate pistachio squares are delicious. Moreover, fold 1/2 cup mini chocolate chips into the filling or drizzle melted chocolate on top. Additionally, cocoa powder (2-3 tablespoons) can be added to the base for chocolate crust.
How do I get clean cuts?
Use a sharp knife wiped clean between each cut. Moreover, dip the knife in warm water and dry before cutting for smoothest results. Additionally, mark cutting lines lightly before making full cuts.
Are these squares gluten-free?
Not naturally, due to graham crackers containing gluten. However, substitute with gluten-free cookies or almond flour crust. Moreover, verify all ingredients are certified gluten-free for celiac safety.
🔗 External Reference: Follow celiac-safe baking guidelines for proper gluten-free preparation.
Can I double the recipe?
Yes, but use two 9×13 pans rather than one larger pan. Moreover, doubling in one pan creates layers too thick to set properly. Additionally, chilling time may need extension for thicker layers.
Nutritional Profile of No-Bake Pistachio Cookie Squares
Key Nutritional Components
- Calories: Approximately 285 per square
- Protein: 6g from pistachios and cream cheese
- Healthy Fats: 18g, primarily from nuts
- Carbohydrates: 24g including natural and added sugars
Health Benefits of Pistachios
Pistachios provide heart-healthy monounsaturated fats and plant-based protein. Moreover, they contain antioxidants and essential minerals like potassium. Additionally, the fiber content supports digestive health.
Making Large Batches of No-Bake Pistachio Cookie Squares
Scaling Up Successfully
Double or triple recipes using multiple pans rather than larger single pans. Moreover, maintain proper layer thickness for even setting. Additionally, ensure adequate refrigerator space before beginning large batches.
Batch Cooking for Events
Prepare squares 2-3 days ahead for large gatherings. Furthermore, wrap individual portions for easy serving. Consequently, you’ll reduce day-of-event stress significantly.
Seasonal Twists on No-Bake Pistachio Cookie Squares
Holiday Modifications
Christmas: Add cranberries and orange zest for festive flavors. Easter: Incorporate lemon and pastel decorations. Summer: Include fresh berries for seasonal freshness.
Seasonal Ingredient Availability
Peak pistachio season (fall) offers best prices and quality. Moreover, plan purchases during harvest season for optimal value. Additionally, proper storage extends usability year-round.
Your Journey to Perfect No-Bake Pistachio Cookie Squares
These no-bake pistachio cookie squares represent the perfect marriage of convenience and elegance. Moreover, you’ve learned professional techniques that ensure consistent, impressive results every time. Additionally, the versatility of this recipe means you’ll return to it for countless occasions.
From understanding ingredient selection to mastering presentation techniques, you now possess the knowledge to create bakery-quality desserts at home. Furthermore, the troubleshooting tips and variations provide confidence to experiment and customize. Consequently, this recipe becomes a foundation for your dessert-making repertoire.
Remember that great baking comes from practice and attention to detail. Moreover, each time you make these squares, you’ll refine your technique and discover new preferences. Therefore, embrace the process and enjoy sharing these delicious creations with family and friends.
Ready to Create Your Own No-Bake Pistachio Cookie Squares?
🎯 Take Action Now:
- 📌 Pin this recipe to your dessert board for easy access
- 📸 Share your results on social media using #PistachioSquares
- 💬 Leave a comment below with your favorite variations
- ⭐ Rate this recipe to help other bakers
- 📧 Subscribe to our newsletter for more no-bake dessert recipes
You Might Also Love:
Print
The Irresistible Charm of No-Bake Pistachio Cookie Squares
- Total Time: 2 hours 20 minutes
Ingredients
-
1 ½ cups pistachios, shelled
-
2 cups crushed digestive cookies or graham crackers
-
½ cup unsalted butter, melted
-
½ cup sweetened condensed milk
-
¼ cup honey or maple syrup
-
1 tsp vanilla extract
-
¼ tsp sea salt
-
Optional: white chocolate drizzle + chopped pistachios for topping
Instructions
-
Prepare the Base: Blend pistachios in a food processor until finely ground. Add crushed cookies and pulse together.
-
Mix Wet Ingredients: In a bowl, whisk melted butter, condensed milk, honey, vanilla, and sea salt.
-
Combine: Stir dry ingredients into the wet mixture until well incorporated.
-
Shape the Squares: Line an 8×8-inch pan with parchment paper. Press mixture evenly into the pan.
-
Chill: Refrigerate for at least 2 hours, or until set.
-
Serve: Cut into 16 squares. Add a white chocolate drizzle and sprinkle chopped pistachios if desired.
💡 Tips & Variations
-
Swap honey for maple syrup for a vegan option.
-
Use graham crackers for a sweeter base or digestive cookies for a more neutral flavor.
-
Add dried cranberries or chopped dates for extra texture.
- Prep Time: 20 minutes
- Cook Time: 2 hours
Nutrition
- Calories: 220
- Sodium: 80 mg
- Fat: 14 g
- Saturated Fat: 6 g
- Cholesterol: 10 mg
Leave a Comment