Why You’ll Love These Bars
Looking for a healthy, no-fuss snack that satisfies your chocolate cravings and fuels your day? These no-bake chocolate chia oat bars are a perfect match. Made with wholesome ingredients like oats, chia seeds, nut butter, and cocoa powder, they’re rich in fiber, protein, and antioxidants—all without needing an oven.
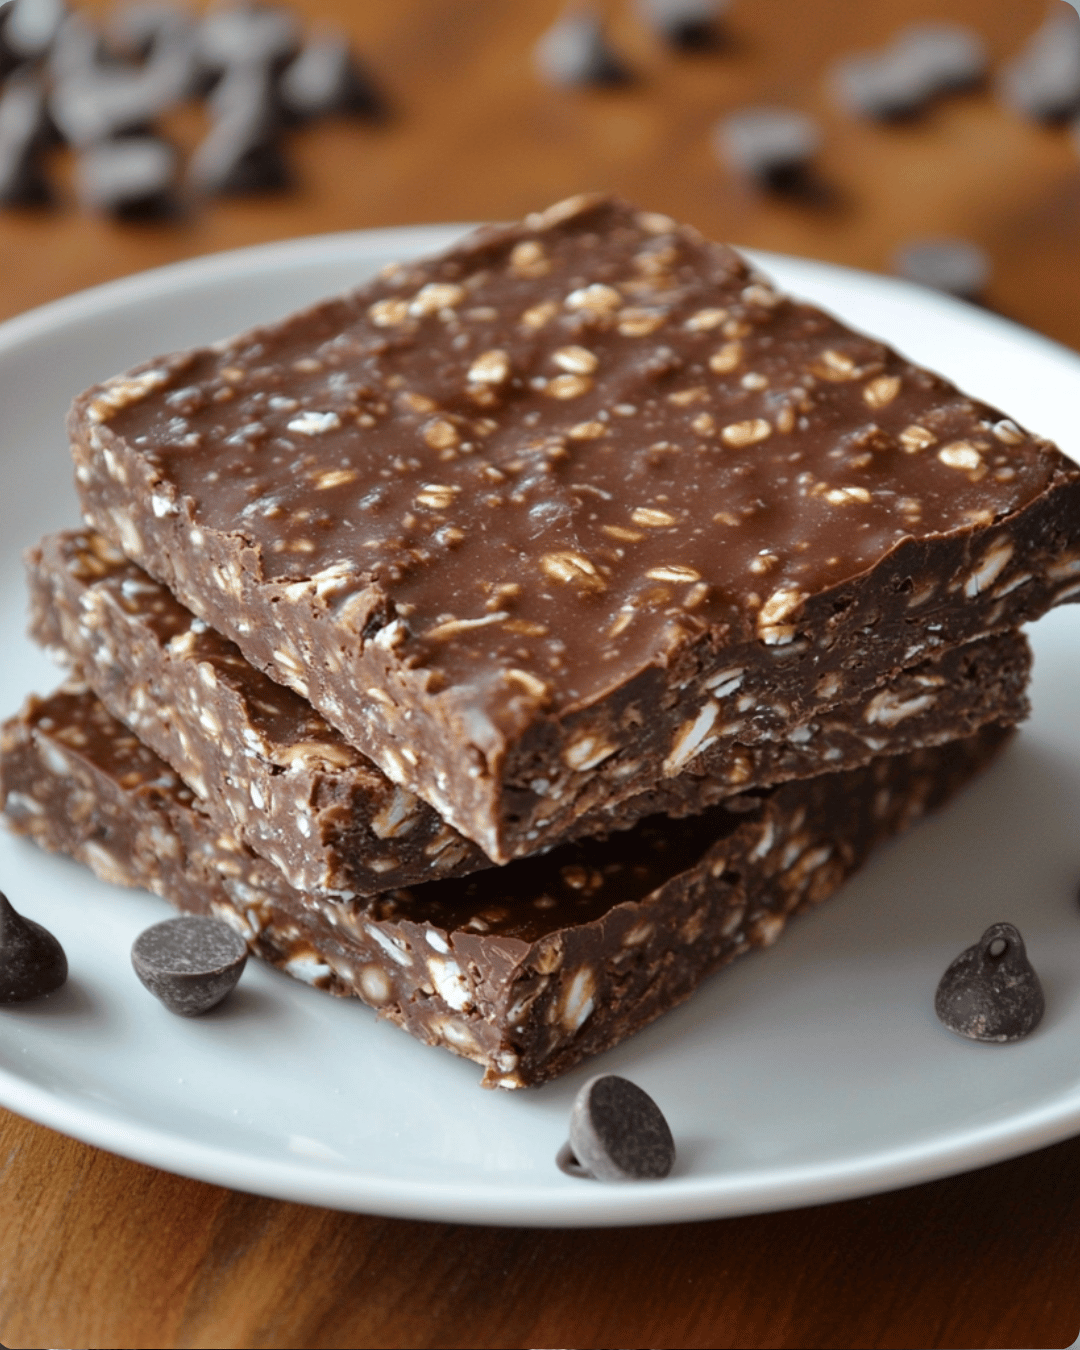
These bars are naturally sweetened, gluten-free (if using certified gluten-free oats), and can be made vegan-friendly. They’re perfect for busy mornings, post-workout fuel, or an afternoon pick-me-up. If you love no-bake treats, check out our peanut butter granola energy bites — no bake for another quick and nutritious option.
Simple to prep and easy to customize, you can swap ingredients like sweeteners or nut butters to fit your dietary needs. These bars hold well in the fridge or freezer, making them a great meal-prep snack.
Prep Time
- Preparation time: 10 minutes
- Chill time: 1 hour
- Total time: About 1 hour 10 minutes
No-Bake Chocolate Chia Oat Bars
- Total Time: About 1 hour 10 minutes
- Yield: 1 1x
Ingredients
1½ cups rolled oats
¼ cup chia seeds
¼ cup unsweetened cocoa powder
½ cup peanut butter or almond butter
⅓ cup honey or maple syrup
1 tsp vanilla extract
¼ tsp salt
½ cup dark chocolate chips (plus extra for topping, optional)
Instructions
In a large mixing bowl, combine the rolled oats, chia seeds, cocoa powder, and salt.
In a small saucepan over low heat, melt the peanut butter and honey together until smooth. Remove from heat and stir in vanilla extract.
Pour the wet mixture over the dry ingredients and mix until fully combined.
Fold in the dark chocolate chips.
Press the mixture firmly into a parchment-lined 8×8 inch pan. Use the back of a spoon or a flat spatula to even it out.
Sprinkle additional chocolate chips on top and lightly press them in.
Chill in the refrigerator for at least 1 hour, then cut into bars.
- Prep Time: 10 minutes
- Cook Time: 1 hour
Nutrition
- Serving Size: 12
- Calories: 190
- Sugar: 8 grams
- Sodium: 70 mg
- Fat: 11 grams
- Saturated Fat: 2 grams
- Carbohydrates: 20 grams
- Fiber: 4 grams
- Protein: 5 grams
Preparation Phase and Tools to Use
Essential Tools and Equipment
- Large mixing bowl
- Silicone spatula or wooden spoon
- Measuring cups and spoons
- 8×8 inch square pan
- Parchment paper
- Saucepan (if heating ingredients)
Importance of Each Tool
- Mixing bowl and spatula make it easy to combine thick, sticky ingredients
- Measuring tools ensure proper proportions for texture and taste
- Parchment-lined pan prevents sticking and makes it easier to lift out the bars
- A small saucepan may be used to gently heat and combine nut butter and syrup
Preparation Tips
- Use creamy nut butter at room temperature for easier mixing
- Stir chia seeds thoroughly—they bind and thicken the mixture
- Don’t skip chilling; it helps bars set firmly
- Press the mixture firmly and evenly into the pan for clean slicing
Ingredients List
Dry Ingredients
- 2 cups rolled oats
- ¼ cup chia seeds
- ¼ cup unsweetened cocoa powder
- ½ teaspoon salt
- ½ cup mini chocolate chips (optional)
Wet Ingredients
- ¾ cup creamy almond butter (or peanut butter)
- ½ cup maple syrup or honey
- 1 teaspoon vanilla extract
- 1 tablespoon coconut oil (optional, for smoother texture)
Optional Add-ins
- Chopped nuts or seeds
- Dried cranberries or raisins
- Protein powder
- Shredded coconut
Step-by-Step Directions
1. Prepare the Pan
Line an 8×8 inch pan with parchment paper, leaving extra hanging over the edges for easy lifting.
2. Mix the Dry Ingredients
In a large bowl, combine rolled oats, chia seeds, cocoa powder, salt, and chocolate chips. Stir well.
3. Warm and Mix the Wet Ingredients
In a small saucepan over low heat (or using a microwave), gently warm the nut butter, maple syrup, vanilla, and coconut oil. Stir until smooth and well combined.
4. Combine Everything
Pour the wet mixture into the dry ingredients. Stir until all dry ingredients are evenly coated. The mixture should be thick and sticky.
5. Press into Pan
Transfer the mixture to your prepared pan. Press it down firmly with a spatula or the bottom of a glass to create an even layer.
6. Chill
Refrigerate for at least 1 hour or until set.
7. Slice and Store
Lift the chilled mixture from the pan using the parchment paper. Slice into bars. Store in the fridge for up to 7 days or freeze for up to 2 months.
Serving Suggestions
These bars are incredibly versatile. Here’s how to enjoy them:
- As a quick, on-the-go breakfast
- A mid-morning energy boost
- A kid-approved lunchbox snack
- Post-workout fuel
- A healthy dessert alternative
- With yogurt and fruit for a balanced mini-meal
Common Mistakes to Avoid and How to Perfect the Recipe
Mistake: Using stiff or dry nut butter
Fix: Use creamy, room temperature nut butter or gently heat it before mixing.
Mistake: Not chilling long enough
Fix: Chill for at least 1 hour so bars can hold their shape when sliced.
Mistake: Overloading with mix-ins
Fix: Keep add-ins balanced so the mixture remains firm and cohesive.
Mistake: Weak mixing or pressing
Fix: Mix thoroughly and press down firmly to create tight, compact bars.
Side Dish Recommendations
These healthy bars pair well with other light, nutrient-rich items:
- Yogurt with fresh berries
- Mixed fruit salad
- Green smoothies
- Cottage cheese with cinnamon
- Hard-boiled eggs
- Roasted almonds or cashews
- Chia pudding
- Apple slices with peanut butter
You can also pair them with our for a snack box or light lunch setup.
Storage and Reheating Instructions
Refrigerator Storage
Keep bars in an airtight container with parchment between layers. Lasts up to 7 days.
Freezer Storage
Freeze in an airtight container or freezer bag. Good for up to 2 months. Let thaw 15–30 minutes before eating.
Reheating
No reheating is necessary. Bars are meant to be served chilled or at room temperature.
Recipe Tips and Customization Ideas
Ingredient Swaps
- Use sunflower seed butter for a nut-free version
- Swap honey for maple syrup for a vegan option
- Add protein powder to make it post-workout friendly
- Add dried fruit, coconut flakes, or chopped nuts for texture and flavor
Custom Flavor Ideas
- Add cinnamon or nutmeg for warmth
- Mix in orange zest for brightness
- Drizzle melted dark chocolate on top for a dessert twist
Frequently Asked Questions (FAQs)
Can I use quick oats?
Yes, though rolled oats offer more texture.
Are these bars vegan?
Yes, if you use maple syrup and dairy-free chocolate chips.
Do I need to include chia seeds?
They help bind the bars. You can use flaxseed instead or omit, but texture may change.
Do they need to be chilled?
Yes, to set properly. At least 1 hour in the fridge is best.
Can I freeze them?
Yes. Freeze up to 2 months and thaw as needed.
Do they contain gluten?
Use certified gluten-free oats to keep the recipe gluten-free.
How long do they last?
Up to 7 days in the fridge, or 2 months in the freezer.
Do they melt at room temperature?
They soften slightly but hold their shape for several hours.
Conclusion
No-bake chocolate chia oat bars are an ideal recipe for anyone looking to eat clean, stay full longer, and satisfy chocolate cravings in a healthier way. They are easy to make, highly adaptable, and packed with nutrient-dense ingredients.
From busy mornings to late-night cravings, these bars fit seamlessly into your lifestyle. Whether you’re an athlete, a parent, or just someone who loves healthy snacking, this recipe belongs in your kitchen.
Explore more clean snack recipes like our peanut butter energy bites and to expand your meal-prep rotation.
Call to Action
If you try this recipe, let us know how it turned out. Share your version, leave a comment with your favorite custom twist, and subscribe for more no-bake snack ideas.
Leave a Comment