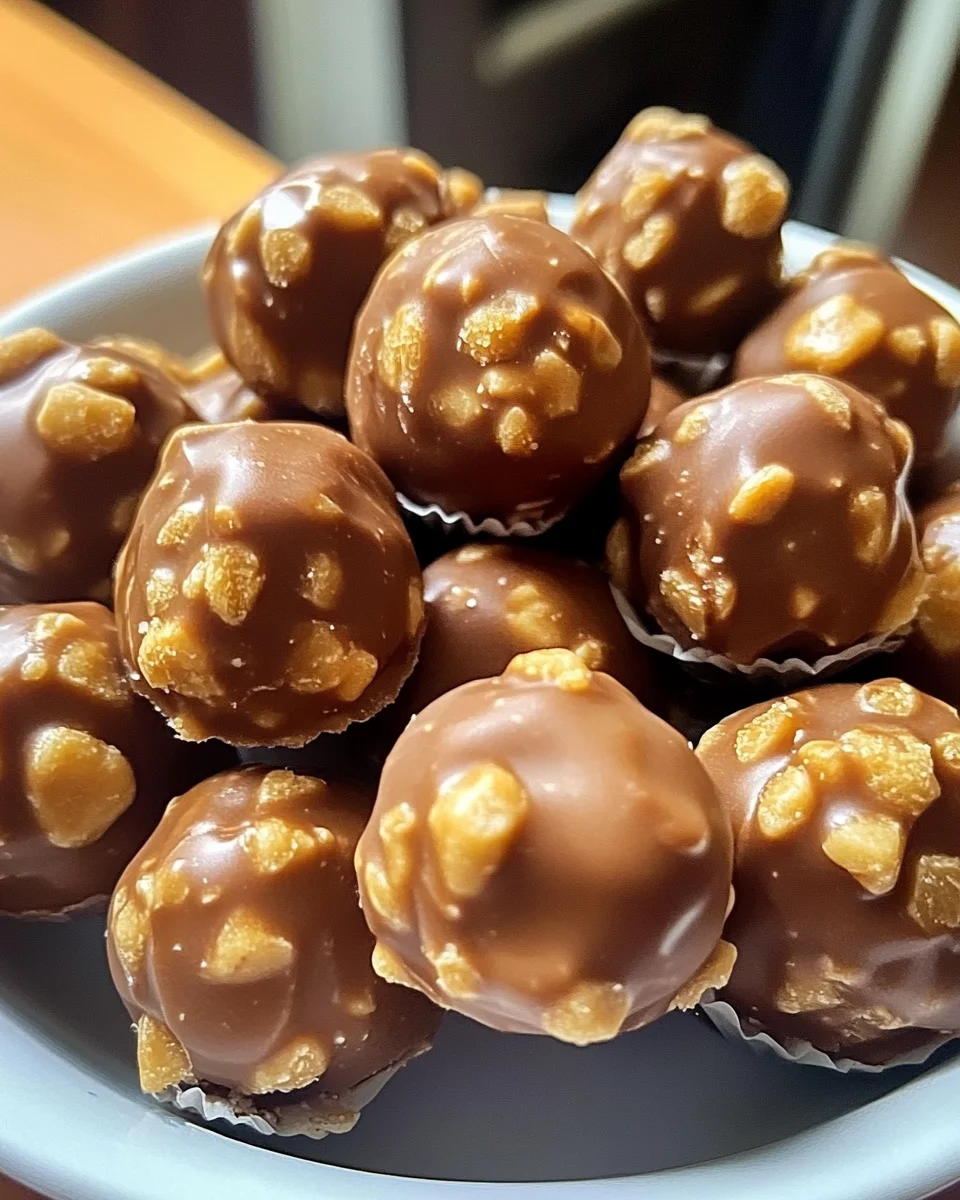
Indulge your taste buds with Butterfinger Balls, a delightful treat that combines creamy peanut butter, crunchy graham crackers, and the sweetness of Butterfinger candy bars, all enveloped in rich chocolate. Perfect for parties, holidays, or just a sweet snack, these blissful bites are sure to impress friends and family alike. With their unique flavor profile and simple preparation, you’ll find yourself making them for every occasion!
Why You’ll Love This Recipe
- Easy to Make: With just a few simple ingredients and straightforward steps, you’ll have these treats ready in no time.
- Irresistible Flavor: The combination of peanut butter and Butterfinger creates a mouthwatering flavor that is hard to resist.
- Versatile Treat: Whether it’s a holiday party or a casual get-together, these Butterfinger Balls fit right in any setting.
- Fun to Customize: Add your favorite toppings or variations to make them uniquely yours!
- Perfect for Sharing: With 20 servings, these treats are great for sharing with friends or keeping on hand for snacking.
Tools and Preparation
To create your delicious Butterfinger Balls, you’ll need some essential tools to make the process smooth and enjoyable.
Essential Tools and Equipment
- Mixing bowl
- Electric mixer or stand mixer
- Cookie sheet
- Parchment paper
- Microwave-safe bowl
Importance of Each Tool
- Mixing bowl: Provides ample space for combining all ingredients effortlessly.
- Electric mixer or stand mixer: Ensures thorough mixing of the dough, achieving that creamy texture.
- Cookie sheet: Ideal for shaping and freezing the balls without sticking.
Ingredients
For the Dough
- 4 tablespoons softened butter (½ stick)
- 1 teaspoon vanilla extract
- 1 cup powdered sugar
- 1 cup peanut butter (avoid all-natural varieties)
- ¾ cup crumbs from graham crackers
- ½ cup Butterfinger bars (crushed)
For Coating
- 8 ounces chocolate bark or chocolate chips
For Garnish (Optional)
- Additional crushed Butterfinger bars
- Festive sprinkles
- Coarse sea salt
How to Make Butterfinger Balls
Step 1: Prepare the Dough
In a mixing bowl, combine the peanut butter and softened butter. Use an electric mixer set to medium speed and blend until the mixture is creamy and uniform.
Step 2: Add Aromatic Notes
Incorporate the vanilla extract into the mixture and blend thoroughly until well combined.
Step 3: Sweeten the Deal
Gradually add the powdered sugar in increments while blending at a low speed. Remember to scrape down the sides of the bowl to ensure even mixing.
Step 4: Crunch Time
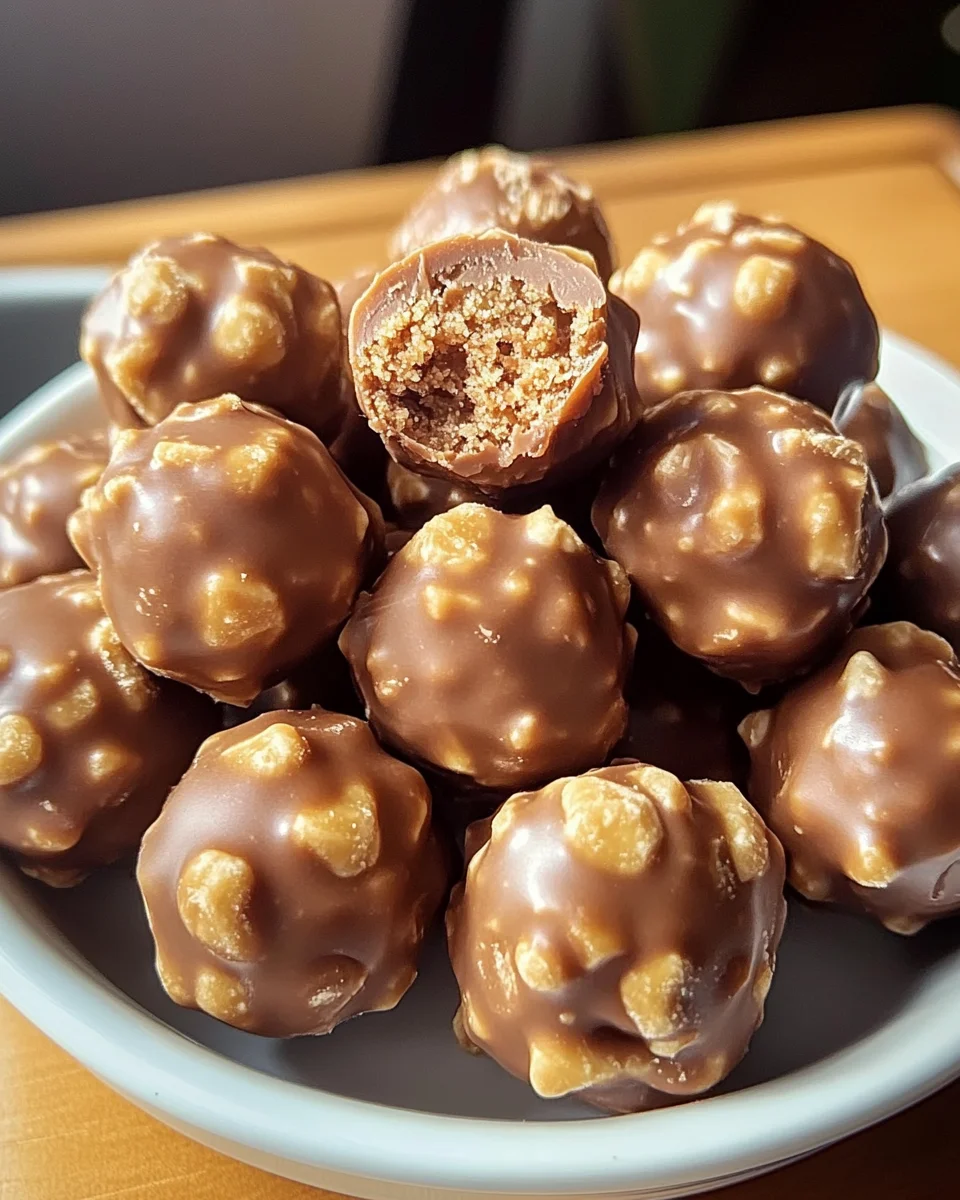
Gently fold in the graham cracker crumbs and crushed Butterfinger bars using a spatula until fully incorporated.
Step 5: Shape ’em Up
Align a large cookie sheet with parchment paper. Scoop out approximately 1 to 1½ tablespoons of dough, roll it into neat balls, and place them on the cookie sheet.
Step 6: Chilling Phase
Freeze the dough balls on the sheet for about 30 minutes until they are completely firm.
Step 7: Melting the Chocolate
Once chilled, proceed to melt the chocolate. Utilize a microwave-safe bowl and heat in 30-second spurts at 50% power, stirring between each interval until smooth.
Step 8: Coat and Decorate
Submerge each chilled ball into the luscious melted chocolate. You can fully coat them or leave part of the peanut butter mixture exposed for added texture.
Step 9: Finishing Touches
Add optional garnishes like additional crushed Butterfinger bars or festive sprinkles while the chocolate is still wet.
Step 10: The Grand Finale
Allow the chocolate to solidify completely before indulging in your amazing Butterfinger Balls! Enjoy!
How to Serve Butterfinger Balls
Butterfinger Balls are a delightful treat that can be enjoyed in various ways. Whether you’re hosting a party or simply indulging at home, these sweet bites are sure to please!
For Parties
- Dessert Platter: Arrange the Butterfinger Balls on a decorative platter with fresh fruits for contrast.
- Gift Baskets: Package them in cute boxes alongside other sweets for thoughtful gifts.
With Drinks
- Coffee Pairing: Serve alongside a cup of coffee to balance the sweetness.
- Milkshake Delight: Blend them into milkshakes for an indulgent dessert drink.
Special Occasions
- Holiday Treats: Use festive decorations to make them suitable for Christmas or Halloween parties.
- Game Day Snacks: Present these as a fun dessert option during sports events and gatherings.
How to Perfect Butterfinger Balls
Creating the perfect Butterfinger Balls requires some attention to detail. Here are some helpful tips:
- bold Use Room Temperature Ingredients: Ensure that your butter and peanut butter are at room temperature for easy mixing.
- bold Don’t Overheat Chocolate: Melt your chocolate slowly to avoid burning; it should be smooth and glossy.
- bold Chilling is Key: Allow the dough balls ample time in the freezer to firm up before coating.
- bold Experiment with Toppings: Get creative by trying different toppings like nuts or coconut flakes for added texture.
- bold Keep Them Fresh: Store leftovers in an airtight container in the fridge to maintain their freshness.
Best Side Dishes for Butterfinger Balls
While Butterfinger Balls are delicious on their own, pairing them with complementary side dishes can elevate your dessert experience. Here are some tasty options:
- bold Vanilla Ice Cream: A classic pairing that balances out the rich flavors of the Butterfinger Balls.
- bold Fresh Berries: Serve with strawberries or raspberries for a refreshing contrast.
- bold Chocolate Fondue: Provide a fondue pot for dipping; it enhances the chocolate experience.
- bold Marshmallow Fluff Dip: A sweet dip that adds another layer of flavor and fun.
- bold Whipped Cream: Serve with a dollop of whipped cream for extra creaminess.
- bold Fruit Salad: A light fruit salad can cleanse the palate after indulging in these sweet bites.
Common Mistakes to Avoid
When making Butterfinger Balls, it’s easy to encounter some common pitfalls. Here are a few mistakes to watch out for:
- Using natural peanut butter: Natural peanut butter can make the mixture too runny. Choose conventional peanut butter for better consistency.
- Skipping the chilling phase: Not freezing the dough balls can result in messy coatings. Ensure they are firm before dipping in chocolate.
- Overheating chocolate: Melting chocolate too quickly can lead to a burnt texture. Heat in short bursts and stir often for a smooth finish.
- Not measuring ingredients accurately: Inaccurate measurements can affect flavor and texture. Use precise measuring tools for best results.
- Forgetting optional garnishes: Leaving out toppings can reduce visual appeal. Add crushed Butterfinger bars or sprinkles for a festive touch.
Refrigerator Storage
- Store your Butterfinger Balls in an airtight container.
- They will last up to 1 week in the refrigerator.
Freezing Butterfinger Balls
- Place the balls in a single layer on a cookie sheet until solid, then transfer them to an airtight container.
- You can freeze them for up to 3 months.
Reheating Butterfinger Balls
- Oven: Preheat the oven to 350°F (175°C) and warm them for about 5 minutes.
- Microwave: Heat on low power for 10-15 seconds until slightly warm.
- Stovetop: Place them in a non-stick pan over low heat, turning frequently until warmed through.
Frequently Asked Questions
How do I make Butterfinger Balls without chocolate?
You can use white chocolate or yogurt coating instead of milk chocolate for a different flavor profile.
Can I use other candy bars instead of Butterfinger?
Yes, feel free to substitute with any candy bar you prefer, like Snickers or Reese’s, but note that this will change the flavor.
Are Butterfinger Balls gluten-free?
Using gluten-free graham cracker crumbs makes this recipe gluten-free; check labels on all ingredients used.
What occasions are perfect for serving Butterfinger Balls?
These treats are great for parties, holidays, or as a fun dessert at family gatherings. Their bite-sized nature makes them easy to share!
Final Thoughts
Butterfinger Balls are not just delicious; they are incredibly versatile too! You can customize them with different toppings or fillings based on your preferences. These sweet treats are perfect for any occasion, and once you make them, they’ll surely become a favorite among family and friends!
Butterfinger Balls
- Total Time: 15 minutes
- Yield: Approximately 20 servings 1x
Description
Indulge in the deliciousness of Butterfinger Balls, a no-bake treat that brings together creamy peanut butter, crunchy graham crackers, and the delightful crunch of Butterfinger candy bars—all coated in rich chocolate. Perfect for any occasion, these sweet bites are incredibly easy to make and will impress friends and family alike. Whether you’re hosting a party or simply craving a sweet snack at home, these Butterfinger Balls are sure to satisfy your taste buds!
Ingredients
- 4 tablespoons softened butter
- 1 teaspoon vanilla extract
- 1 cup powdered sugar
- 1 cup peanut butter (avoid all-natural varieties)
- ¾ cup graham cracker crumbs
- ½ cup crushed Butterfinger bars
- 8 ounces chocolate bark or chocolate chips
Instructions
- In a mixing bowl, combine softened butter and peanut butter; mix until creamy.
- Add vanilla extract and blend until incorporated.
- Gradually mix in powdered sugar until well combined.
- Fold in graham cracker crumbs and crushed Butterfinger bars.
- Roll dough into balls (1 to 1½ tablespoons each) and place on a parchment-lined cookie sheet.
- Freeze for about 30 minutes until firm.
- Melt chocolate in a microwave-safe bowl; dip chilled balls into melted chocolate and coat evenly.
- Optional: Add toppings like crushed Butterfinger bars before chocolate sets.
- Let chocolate solidify completely before serving.
- Prep Time: 15 minutes
- Cook Time: 0 minutes
- Category: Dessert
- Method: No-Bake
- Cuisine: American
Nutrition
- Serving Size: 1 serving
- Calories: 120
- Sugar: 9g
- Sodium: 45mg
- Fat: 7g
- Saturated Fat: 3g
- Unsaturated Fat: 4g
- Trans Fat: 0g
- Carbohydrates: 12g
- Fiber: 0g
- Protein: 3g
- Cholesterol: 5mg
Leave a Comment